
A milling cutter applies force to the workpiece. If the part can shift, lift, rotate, or flex, the machine produces inaccurate dimensions, poor surface finish, or unstable cutting even when the tooling and cutting parameters are correct.
Workholding is how you prevent that — the setup that keeps a part exactly where you put it while the cutter removes material around, into, or through it. On a small milling machine, where the table, vise, and spindle already have less mass and rigidity than a full-size mill, getting workholding right matters even more.
This guide covers how to choose the right workholding method, how to check a setup before you cut, and the mistakes that quietly ruin accuracy even when everything else looks correct.
What Is Workholding in Milling?
Workholding is the method used to secure, position, and support a workpiece during a milling operation so it resists cutting forces without shifting, lifting, or flexing. A good setup holds the part in a known, repeatable location while giving the cutter clear access to the area being machined. Common workholding devices include milling vises, clamps, and fixtures.
Why Does Workholding Matter on a Small Milling Machine?
A small mill has less mass than a full-size machine, which means it absorbs less of the disturbance a moving workpiece creates. Problems that a large industrial mill shrugs off show up immediately on a benchtop or mini mill.
Prevents Workpiece Movement
If the workpiece moves during a cut, the cutter no longer follows the intended path. That changes dimensions, leaves an uneven surface, or causes the tool to cut unpredictably. Once a part shifts mid-operation, it is usually scrap.
Reduces Vibration and Chatter
A loosely held workpiece flexes under cutting force; that flex creates vibration, and vibration feeds back into the cut, making it worse with every pass. This is a common hidden cause behind milling machine chatter that looks like a spindle speed problem but is actually a workholding problem.
Helps Maintain Accuracy
If the part is not held in the same position it was set up in, every dimension on the finished part is thrown off by whatever amount the part moved. This is a quiet cause behind parts that come out of tolerance even when the program was correct.
Improves Surface Finish
Movement or flex during the cut changes how the cutting edge engages the material. Instead of a clean, consistent pass, the tool removes uneven amounts of material, leaving visible marks and a rougher finish than the cutting parameters should produce.
Helps Prevent Tool Problems
A workpiece that shifts or rocks changes the load on the cutting edge without warning. That sudden change is a common contributor to unexpected tool wear and breakage, especially with small-diameter end mills that already have limited rigidity to spare.
What Are the Common Workholding Methods for Milling?
Most milling operations on small machines are handled with one of three basic methods: a vise, direct clamps, or a fixture. Each one suits a different kind of part.
Milling Vise
A milling vise is the most common workholding method for small shop and hobby machining. It grips the part between two jaws, applying clamping force from both sides.
A vise works well for rectangular or block-shaped parts where there is enough flat surface for the jaws to engage properly. It is fast to set up, repeatable from one part to the next, and gives the cutter clear access to the top and sides of the workpiece.
The limitation is jaw engagement. If there is not enough material for the jaws to grip, or the part shape does not present flat, parallel surfaces to the jaws, a vise alone will not hold the part securely. Thin stock, irregular shapes, and parts with features on all sides often need a different approach.
Milling Machine Clamps
Clamps hold the workpiece directly to the table rather than between jaws. This is the method to reach for when the part is too large for the vise, has an irregular shape, or needs the cutter to access an area the vise jaws would otherwise block.
With clamps, placement matters more than with a vise. The clamp needs to sit clear of the cutter’s path, press down on solid material rather than a thin or unsupported edge, and have support underneath it so the clamping force does not bend the part instead of holding it flat.
Clamps give more flexibility for odd shapes and larger stock than a vise does, but they take more setup thought since there is no built-in jaw alignment doing the work for you.
Milling Fixtures
A fixture is a custom or semi-custom setup built to hold one specific part, or a family of similar parts, in a repeatable position. Fixtures earn their setup time when you are making the same part more than once, when the part shape does not present anywhere obvious for a vise or clamp to grip, or when you need to locate the part precisely without measuring it in from scratch every time.
For a one-off part, a fixture is usually more setup effort than it is worth. For repeated parts or unusual geometry, a fixture is often the only reliable way to hold the work consistently.
Milling Vise vs Clamps: Which Should You Use?
Neither method is universally better. The right choice depends on the part’s shape, size, and what the cutter needs to reach.
| Factor | Milling Vise | Clamps |
|---|---|---|
| Best for | Regular-shaped, block-style parts | Larger or irregular parts |
| Setup | Quick, repeatable | More setup flexibility, more thought required |
| Repeatability | Good, built into the jaw alignment | Depends on how the clamps are placed |
| Cutter access | Can be limited by jaw position | Often more flexible |
| Part size | Limited by jaw capacity | More flexible for large or odd stock |
| Main concern | Jaw engagement — enough flat surface to grip | Support and clamp placement |
For a straightforward rectangular part, reach for the vise first. When the part is too big, too irregular, or the vise jaws would block the area you need to cut, switch to clamps.
How Do You Choose the Right Workholding Method?
Match the method to the situation rather than defaulting to whatever is already set up on the table.
| Workpiece Situation | Possible Method |
|---|---|
| Rectangular block | Milling vise |
| Large plate | Clamps |
| Irregular part | Clamps or a fixture |
| Thin part | Supported clamping |
| Repeated parts | Fixture |
| Very small part | Vise, fixture, or a specialized holding method |
Beyond matching the part shape to a method, weigh these factors before starting the cut:
- Part shape: flat, regular surfaces favor a vise; irregular shapes favor clamps or a fixture
- Part size: very large or very small parts often rule out a standard vise setup
- Cutting forces: heavier cuts need a more rigid, better supported setup
- Access required: make sure the workholding does not block the area you need to cut
- Amount of material being removed: heavy stock removal shifts the part’s balance and support needs as the cut progresses
- Repeatability: one-off parts do not need the same setup investment as a batch of ten
- Whether the part needs to be flipped: plan how you will hold it for the second side before you start the first
How to Hold Small Parts for Milling
Small parts create their own set of problems. There often is not enough material for the vise to grip, or what little material there is disappears as soon as machining begins.
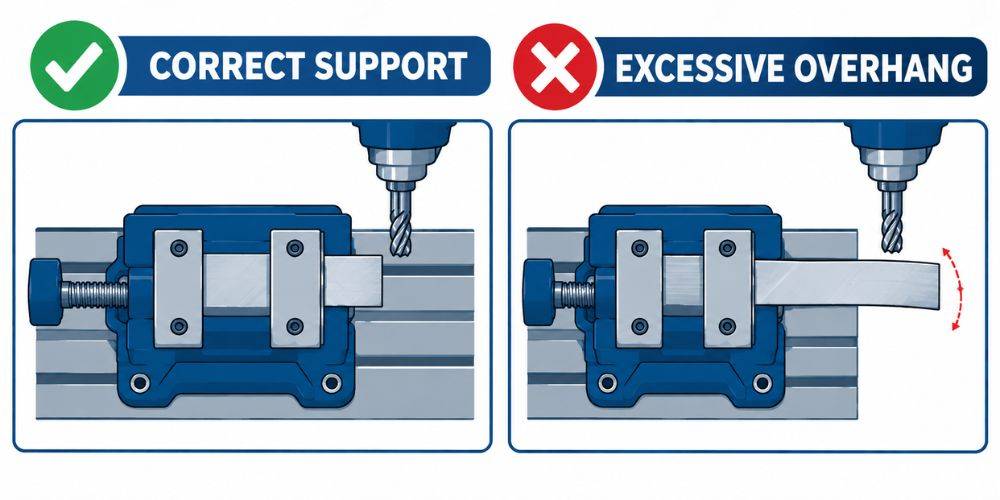
Keep the Unsupported Area Short
The more of the part that sticks out past its support, the more it can flex or lift under cutting force. Keep the unsupported length as short as the operation allows.
Give the Part Enough Support
If there isn’t enough material for the vise to grip, change the setup before making the cut. That might mean holding onto extra stock that gets removed later, using a sacrificial tab, or switching to a fixture that supports more of the part’s surface.
Avoid Excessive Clamping Force
More force is not automatically better. On a small part, too much clamping pressure can distort the material enough to throw off the finished dimensions once the part is released from the vise.
Keep the Cutter Clear
Small setups often put the vise, clamps, or fixture close to the area being cut. Check the tool path before running the job to make sure nothing in the setup sits where the cutter needs to travel.
Plan the Second Operation
Workholding gets much easier when the machining sequence is planned around what material needs to remain available for gripping later. If a part needs to be flipped for a second operation, decide during the first setup what you will hold onto for the second one. Machining away the only surface you could have gripped is a common and avoidable mistake.
How to Hold Thin or Irregular Parts
Thin Parts
Thin stock flexes easily, and that flex shows up as chatter, poor finish, or parts that are not flat once removed from the setup. Support the part across as much of its underside as possible, minimize the unsupported area, and use only as much clamping force as needed to keep it from moving. Too much force on thin material bends it, and it springs back out of tolerance once released.
Irregular Parts
Parts without flat, parallel surfaces need something other than a standard vise setup. Fixtures, soft jaws machined to match the part’s shape, and clamps positioned on solid areas of the part are the usual options. The goal is always the same: find enough locating and supporting surface to hold the part still without distorting it.
How Do Cutting Forces Affect Workholding?
The relationship is straightforward: cutter → cutting force → workpiece → workholding. If the setup cannot resist the direction and magnitude of that force, the part moves.
- Direction of force — the cutter pushes the workpiece in a specific direction depending on the cut; workholding needs to resist that direction, not just hold the part in general
- Clamping position — clamps placed too far from the cutting area give the part more room to flex before the clamp resists it
- Support underneath — a gap under the part lets it flex downward under force even if it is clamped tightly on top
- Rigidity — a more rigid setup transmits less of the cutting force into movement and more of it into actual material removal
- Overhang — any part of the workpiece that extends past its support acts like a lever, and cutting force at the tip of that lever creates far more movement than the same force applied closer to the support
More clamping force is not automatically better. For thin parts, excessive force can distort the workpiece just as easily as insufficient force lets it move. The goal is matching the setup to the direction and size of the force the cut will actually generate, not maximizing force across the board.
Common Workholding Mistakes
- Chips or debris left under the workpiece, which lifts the part slightly off a true flat surface
- Too little gripping area for the vise or clamp to hold reliably
- Excessive workpiece overhang past the edge of the support
- Excessive clamping force that distorts the part, especially thin stock
- Poor support underneath a clamped part
- A clamp positioned in the cutter’s path
- Ignoring the direction the cutting force will push the part
- Allowing the part to rock instead of sitting flat and stable
- Poor access for the cutter to reach the full area that needs machining
- Not planning the next operation, then machining away the only surface available to hold onto
When a setup causes problems, experienced machinists usually troubleshoot by changing the support, vise setup, soft jaws, clamp position, or machining sequence rather than simply adjusting feeds and speeds. If the finished part is not coming out right and the program and tooling both check out, the workholding setup is often the real cause.
What Should You Check Before Starting a Milling Operation?
Run through this list before starting any new setup, especially one that is different from your usual routine.
- Is the workpiece sitting on a clean surface, free of chips or debris?
- Is it fully supported, with no gaps underneath?
- Is there enough gripping area for the vise or clamp to hold reliably?
- Can the part rotate or lift under load?
- Is the unsupported length reasonable for the cut being made?
- Are the clamps clear of the cutter’s path for the entire operation?
- Is the cutting direction likely to pull the part against the workholding, or away from it?
- Could the clamping pressure distort the part?
- Can the tool reach the entire area that needs to be cut?
- Will the current setup still work for the next operation, or does the part need to keep extra material for a second op?
What If the Workpiece Moves During Milling?
If a part shifts, rocks, or the finished dimensions are off, the cause is usually somewhere in the workholding setup rather than the program or the tooling. Use this table to narrow down what to check first.
| Symptom | Possible Cause | What to Check |
|---|---|---|
| Part shifts | Insufficient holding force or support | Change the setup — more gripping area or better clamp placement |
| Part rocks | Debris or uneven support underneath | Clean the surface and reseat the part |
| Thin part bends | Excessive clamping force | Reduce force and support the part better underneath |
| Chatter appears | Setup lacks rigidity | Reduce overhang and support the part more directly |
| Dimensions change | Part moved during the operation | Check locating surfaces and clamping pressure |
| Tool contacts clamp | Poor clearance in the setup | Reposition the workholding before continuing |
If chatter is the main symptom rather than outright part movement, our guide on milling machine chatter covers rigidity and setup fixes in more depth. If the finished part is coming out of tolerance even with a solid-looking setup, it is worth reviewing how runout and tool condition can also contribute to inaccurate results.
Conclusion
Good workholding is not about clamping a part as tightly as possible. It is about positioning the workpiece accurately, supporting it against the direction of the cutting force, and keeping the cutter clear to do its job. Whether that means a vise, clamps, or a fixture depends on the part in front of you.
TAIG Tools makes precision vises, clamps, and fixturing accessories built for small mills, so your setup has the rigidity to match. Explore TAIG’s workholding accessories to find the right fit for your next project.
FAQs
What is a workholding device?
A workholding device is any tool used to secure a workpiece during machining so it does not move under cutting forces. Common examples include milling vises, clamps, and fixtures, each suited to different part shapes and sizes.
What is the most common workholding device for a mill?
The milling vise is the most common workholding device for small shop and hobby milling. It is fast to set up, repeatable, and works well for rectangular or block-shaped parts.
What are some examples of workholding tools?
Common workholding tools include milling vises, table clamps, fixtures, soft jaws, and specialized holding methods for thin, small, or irregular parts. The right choice depends on the part’s shape and the operation being performed.
What is workholding in CNC machining?
Workholding in CNC machining is the method used to secure a workpiece in a fixed, repeatable position so the programmed toolpath cuts accurately. Because CNC operations often run unattended, a secure and repeatable setup matters even more than on manual machines.
What are the different types of workholding methods?
The main workholding methods for milling are vises, direct table clamps, and fixtures. Vises suit regular block-shaped parts, clamps suit larger or irregular parts, and fixtures suit repeated parts or unusual geometry that a vise or clamp cannot grip reliably.
What is the difference between a vise and a clamp?
A vise holds a part between two jaws using clamping force from both sides, while a clamp presses the part directly against the table from one side. A vise is faster and more repeatable for regular shapes; clamps give more flexibility for larger or irregular parts.
What is a milling vise used for?
A milling vise is used to hold rectangular or block-shaped workpieces securely during milling. It provides quick, repeatable setups and clear cutter access for parts with enough flat surface for the jaws to grip.
How do you prevent a workpiece from moving during milling?
Use enough gripping area, support the part fully with no gaps underneath, keep unsupported overhang short, and match the clamping position to the direction of the cutting force. Checking the setup before starting the cut prevents most movement problems.
How do you hold small parts for milling?
Small parts need extra attention to gripping area and support. Keep sacrificial stock to hold onto where possible, avoid excessive clamping force that could distort the part, and plan how the part will be held for any second operation before starting the first cut.
