If your milling machine suddenly starts vibrating, producing loud cutting noise, or leaving rough surface marks, you are likely dealing with milling chatter. This problem frustrates many machinists because it affects surface finish, tool life, cutting accuracy, and overall machining confidence.
Many beginners assume chatter only comes from spindle speed, but vibration can actually come from several parts of the cutting setup. Tool deflection, poor rigidity, loose workholding, and incorrect feed rates all contribute to unstable cutting conditions.
Understanding what causes milling chatter is the first step toward fixing it quickly and improving machining performance.
Quick Answer: What Causes Milling Chatter?
Milling chatter is a vibration problem caused by instability between the cutter, spindle, workpiece, or machine structure. Common causes include incorrect spindle speed, tool deflection, poor rigidity, wrong feed rate, and excessive tool stickout. Reducing chatter usually requires improving machine stability and adjusting cutting parameters.
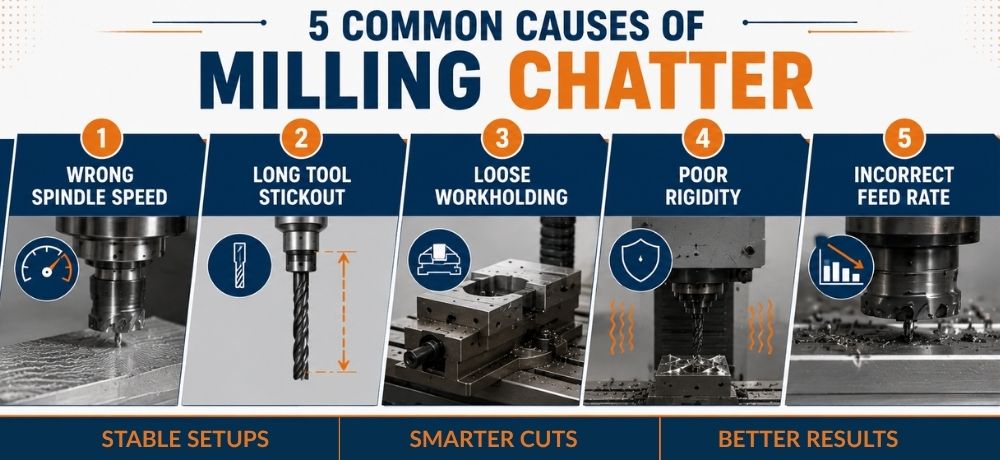
Common Causes of Milling Chatter
- Incorrect spindle speed
- Tool deflection
- Poor machine rigidity
- Wrong feed rate
- Excessive tool stickout
- Loose workholding
What Is Milling Chatter?
Milling chatter is a self-excited vibration that occurs during cutting operations. Instead of cutting smoothly, the tool begins vibrating against the material, creating unstable cutting forces and repeated harmonic movement.
This vibration often produces:
- Loud squealing or buzzing
- Rough surface finish
- Ripple marks
- Tool wear
- Inconsistent cuts
Many machinists notice chatter appearing only at certain spindle speeds. This happens because the machine enters a resonance zone where vibration amplifies instead of stabilizing.
For beginners, chatter can sound similar to normal aggressive cutting, which is why it is often misdiagnosed during early machining projects.
Common Causes of Milling Chatter
Incorrect Spindle Speed
Spindle speed is one of the biggest causes of milling chatter. Certain RPM ranges create harmonic resonance between the cutter, spindle, and workpiece.
Many users lower the RPM immediately when vibration starts, but this does not always solve the problem. In some cases, reducing speed actually increases vibration because the cutter begins rubbing instead of cutting efficiently.
Understanding proper RPM adjustment is part of understanding feeds and speeds for small milling machines.
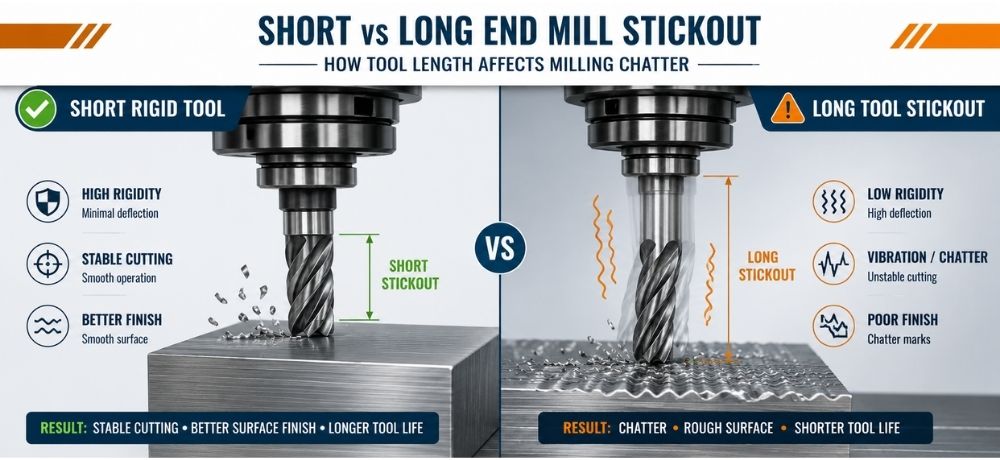
Tool Deflection
Long tool stickout creates flexibility in the cutter. As cutting pressure increases, the tool bends slightly and begins vibrating.
Small end mills are especially sensitive to:
- excessive extension
- aggressive cuts
- hard materials
- unstable setups
Reducing tool stickout is often one of the fastest CNC chatter fix methods available.
Poor Machine Rigidity
Machine rigidity directly affects vibration control. Lightweight machines, loose components, or flexible setups allow cutting forces to amplify chatter.
Common rigidity problems include:
- loose gibs
- flexible workbenches
- worn spindle components
- unstable machine bases
Smaller mills are naturally more sensitive to rigidity changes, especially during deeper cuts or side milling operations.
Wrong Feed Rate
Feed rate mistakes are extremely common among beginners.
One of the biggest misconceptions is that slowing feed always reduces chatter. In reality, feeding too slowly can cause rubbing instead of proper chip formation.
This increases:
- heat
- vibration
- tool wear
- poor finish
Many machinists experiencing machine vibration machining issues are actually running feed rates that are too conservative.
Proper chip formation is critical for stable cutting performance.
Loose Workholding
Loose vises and unstable workholding are often overlooked causes of chatter.
Even a rigid machine can vibrate if the workpiece moves during cutting. Weak clamping allows the material to resonate under cutting pressure.
Common issues include:
- insufficient clamping force
- unsupported workpieces
- long overhangs
- flexible fixtures
Using stable workholding parts and accessories can significantly improve machining stability.
Signs Your Chatter Problem Is Getting Worse
Rough Surface Finish
One of the first warning signs is a sudden decline in finish quality. Ripple patterns and uneven surfaces usually indicate unstable cutting.
Loud Harmonic Noise
Chatter often produces a repeating squeal or buzzing sound. The sound may increase only at specific spindle speeds.
Visible Tool Marks
Parallel vibration marks on the workpiece surface usually indicate cutter instability or tool deflection.
Tool Wear Increasing
Unstable cutting creates additional heat and uneven cutting pressure, which accelerates tool wear and increases breakage risk.
How to Stop Milling Chatter Fast
Reduce Tool Stickout
Keep cutters as short as possible. A shorter tool increases rigidity and reduces deflection.
Adjust Spindle Speed
Small RPM changes can move the machine out of resonance zones and stabilize cutting.
Increase Rigidity
Tighten machine components, secure the workbench, and minimize flex throughout the setup.
Improve Workholding
Ensure the workpiece is fully supported and clamped securely before machining begins.
Use Correct Feed Rate
Avoid rubbing cuts. In some cases, slightly increasing feed improves cutting stability and reduces vibration.
Quick Checklist to Reduce Chatter
- Shorten the tool stickout
- Tighten the machine setup
- Secure workholding firmly
- Adjust spindle speed
- Increase feed slightly if rubbing occurs
- Reduce the excessive depth of cut
Why Small Mills Experience More Chatter
Compact milling machines are more sensitive to chatter because they typically have:
- lighter machine structures
- smaller spindles
- reduced mass
- shorter rigidity margins
This does not mean small mills cannot produce excellent results. Proper setup, tooling selection, and cutting parameters make a major difference in stability.
Many hobby machinists improve results significantly by understanding how machine rigidity, spindle speed, and tooling interact during cutting operations.
Understanding milling direction differences can also help reduce cutting instability in smaller machines.
Chatter Symptom vs Likely Cause
| Symptom | Likely Cause |
|---|---|
| High-pitched squeal | Spindle speed resonance |
| Rough surface finish | Vibration instability |
| Visible ripple marks | Tool deflection |
| Rapid cutter wear | Rubbing cuts |
| Shaking workpiece | Weak workholding |
| Loud harmonic vibration | Poor rigidity |
Beginner Rules to Reduce Chatter
Following a few basic rules can prevent many vibration problems before they begin.
- Keep cutting tools short
- Avoid excessive depth of cut
- Secure work firmly
- Avoid rubbing cuts
- Listen carefully to the machine sound
- Use sharp cutting tools
- Check setup rigidity regularly
These small adjustments often produce major improvements in finish quality and cutting stability.
Why Slower Feed Rates Can Sometimes Make Chatter Worse
Many beginners reduce the feed rate aggressively when chatter begins. While this seems logical, it often creates additional vibration problems.
When the feed becomes too low, the cutter may stop shearing material efficiently and begin rubbing instead. Rubbing generates excess heat and unstable cutting pressure, which increases vibration rather than reducing it.
This is why some machinists notice chatter becoming worse at lighter cuts or slower feeds.
Proper chip formation is essential for stable milling performance, especially in smaller CNC and manual milling machines.
When Chatter Means Your Setup Is Wrong
Persistent chatter usually indicates instability somewhere in the machining system.
Possible setup issues include:
- poor workholding
- excessive tool extension
- loose machine adjustments
- worn spindle components
- incorrect cutting parameters
Regularly maintaining machine accuracy helps reduce vibration problems and improve long-term machining consistency.
Conclusion
Milling chatter is usually a stability problem rather than simply a spindle speed problem. Tool rigidity, workholding, feed rate, machine setup, and cutting conditions all influence vibration during machining.
By improving rigidity, reducing tool deflection, and adjusting cutting parameters correctly, machinists can dramatically improve surface finish, cutting stability, and tool life.
Small milling machines can still produce highly accurate results when setups are stable and machining practices are properly optimized.
Learn more about improving machining accuracy and stability with precision milling solutions from Taig Tools.
FAQs
Why is my milling machine vibrating?
Milling machine vibration is usually caused by chatter, poor rigidity, incorrect spindle speed, loose workholding, or tool deflection during cutting operations.
How do you stop chatter in milling?
Reduce tool stickout, improve workholding, adjust spindle speed, and use proper feed rates to improve cutting stability and reduce vibration.
What causes chatter in machining?
Chatter is caused by unstable cutting forces between the tool, spindle, machine, and workpiece. Poor rigidity and incorrect cutting parameters are common causes.
Does spindle speed affect chatter?
Yes. Certain RPM ranges create resonance zones that amplify vibration and increase chatter during machining.
Can dull tools cause chatter?
Yes. Dull cutting tools increase cutting pressure and heat, which can worsen vibration and surface finish problems.
Can small milling machines reduce chatter effectively?
Yes. Proper setup, stable workholding, sharp tools, and correct feeds and speeds can greatly reduce chatter even on compact milling machines.
